
How To Install Exchange Online PowerShell Module
If you are an admin who is managing your or your client’s Microsoft 365 (formerly Office 365) environment, then you might have heard the importance of using the Exchange Online PowerShell module.
In this article, I will explain how to install Exchange Online PowerShell module, why we need to use it, and how to connect it.
Exchange Online Module Version
Exchange Online has a PowerShell module that has multiple versions. The current version is V3 or you can call it EXO V3.
Since it is a PowerShell module, we need to make sure we have a supported PowerShell core installed on our machine.
EXO V3 supports PowerShell 5.1 and 7 on Windows. However, if you are using Linux or Mac OS, then you need to have PowerShell 7. If you need to know more about this, you can check how to install the PowerShell 7 article.
The installation process for the Exchange Online module is the same on PowerShell 5.1 and 7.
Install Exchange Online PowerShell module
You can install it on both domain-joined and non-domain joined machines as there are no specific requirements.
This requirement comes during the connectivity part which I will explain later in this article.
Set Windows PowerShell Execution Policy
If you are going to install it on a Windows server, then you can skip this step as a RemoteSigned policy is excluded by default in the server.
If you are going to install on Linux or Mac OS then you can ignore this step as those OS has unrestricted execution policy.
This is applicable only if you are using a Windows client machine like Windows 10 or 11.
The reason to set this execution policy is that we are downloading the script that is RemoteSigned from the Internet and that is not something that came with the OS by default.
If you forgot this step and try to load the module after the installation, you will get an error stating that running scripts is disabled on this system.

You can verify the current execution policy on your machine by using the following cmdlet
Get-ExecutionPolicy
Now run the following execution policy cmdlet so that you can load the module after the installation
It is advisable to set this execution at the beginning so I am running the following command.
Set-ExecutionPolicy -ExecutionPolicy RemoteSigned -Scope CurrentUser
It will ask you to press Y.
Once done You can move on to the next section.
PS: It’s a best practice to scope the current user even if you are the only one using the machine.
Install Exchange Online module on Windows
To install the Exchange Online module EXO V3, a NuGet provider is required. This is because EXO V3 is a NuGet-based repository.
Run the following command.
Install-Module -Name ExchangeOnlineManagement -ForceIf you run the installation using the Install-Module cmdlet directly, it will ask your permission to install NuGet first.
I have highlighted it in the following screenshot.

Then press Y to continue the installation.
NuGet will get installed on your machine.
You can also run the Install-Module cmdlet to install NuGet directly
Install-Module -Name PowershellGet -ForceI generally run the Exchange Online command twice to install both PowershellGet /NuGet and Exchange Online Module.
Now I am running the same cmdlet again to install the Exchange Online Module

You can verify which version is installed on your machine by running the following command
Get-InstalledModule ExchangeOnlineManagement
You can see the version is 3.3.0 and it’s a general availability (GA) release.
Now you are good to import it. I will show you the process for Mac OS before explaining to you how to import it.
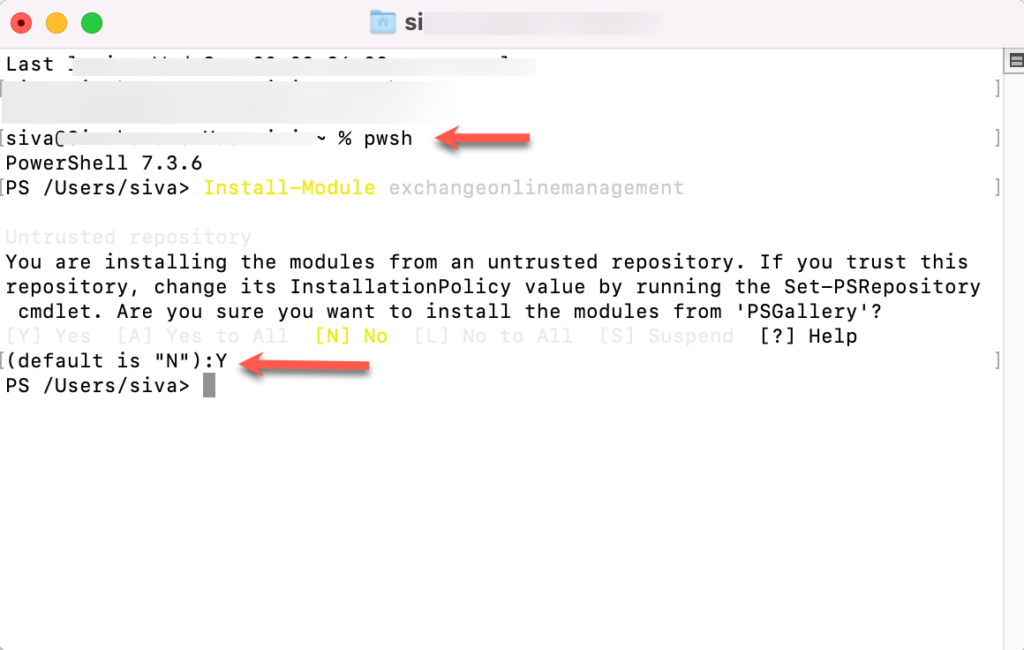
Install Exchange Online module on a Mac OS
It requires PowerShell 7 to install the Exchange Online module. Open your terminal and type the following command
pwshThe cmdlet output will show the version of PowerShell that you have on your machine.
Run the following cmdlet
Install-Module exchangeonlinemanagementPress Y to complete the installation
You have successfully installed it on both Windows and Mac OS.
Importing the Exchange Online PowerShell module
If you just tried to connect it, you will get the following error message stating that the module could not be loaded.

This is because it will not be automatically loaded for the first time.
You have to run the import-module cmdlet to import and load the module.
Import-Module ExchangeOnlineManagement
If you don’t get any error then it means it got successfully loaded.
Troubleshooting the Installation Error
A common error you might face is without running the PowerShell in administrator mode.
If you fail to open it with RunAs admin, then you might get the following error message

You can see the cmdlet output with a failure message. To resolve this issue just right-click the PowerShell and open it with RunAs admin

If you already have an older PowerShellGet installed on your machine, then due to the mismatch of the required version, you will get an error message.
It’s good to update the PowerShellGet to the latest version first and then run the Exchange Online install command.
In order to update it please run the following cmdlet
Update-Module -Name PowerShellGetPrerequisites for connecting to Exchange Online PowerShell
To connect the M365 Exchange online session using a PowerShell, you need to meet certain conditions.
- You need a cloud-only account in Microsoft 365 / Office 365
- You should have administrator access to the M365 /Office 365 environment
- If your company policy restricts the connection only from allowed devices using Intune policy, then you can connect only from the allowed devices
- If you are using Mac or Linux then need PowerShell 7
- Internet connection (lol)
Move on to the next section once you made sure you have completed all the above steps.
Connect to Exchange Online PowerShell V3
In your PowerShell window type the following cmdlet
Connect-ExchangeOnline
This will open a sign-in pop-up as it’s an interactive login option.
Microsoft deprecates the Basic authentication. So it’s advisable to use this method to log in using Modern authentication.
Enter your User Principal Name which is a cloud-only account username and the password.

If you are using multi-factor authentication, based on your settings you will either receive a code to your phone number or to your Microsoft authenticator/any authenticator app depending on how your environment is configured.
In this example, I am getting code to my phone number.

Once you click on Verify/Sign-in, it will authenticate the session and you will be connected.

The PSSession is activated.
How to connect Exchange online on Mac
As I mentioned earlier, Mac only supports PowerShell 7 for EXO V3. PowerShell 7 supports only browser-based authentication.
That is once you enter the connect command, it will open your default browser and ask you to enter the credential.
Open the Terminal in Mac OS and enter the following command
pwshThis will open the PowerShell 7 in your terminal

Then enter the following command
Connect-ExchangeOnline
It will open the browser window.
You have to enter the credentials and click sign in.

It will authenticate the session. You will get the authentication complete message. You can close the browser tab safely.

Your terminal is connected now and pssession is activated.
Now you can run any commands along with the required parameters related to EXO that you have connected. Some of them are
- Mailboxes
- Groups
- Contacts
- Message tracking, etc
Since we are using EXO V3, the commands are different compared to the previous version.
For example,
Instead of using Get-Mailbox, you need to use Get-EXOMailbox
You can learn more about these EXO V3 REST API cmdlets below mentioned article
How to Update the Exchange Online Module?
Microsoft constantly releases updates to all of the modules to enhance the experience, security, functionality, etc.
It’s advisable to keep your modules up to date. You need to use the Update-Module cmdlet.
Run the following cmdlet
Update-Module ExchangeOnlineManagementThis is the same command for both Windows and Mac OS. If there are any updates available, then it will update it. If none is available, you will not get any errors.
What’s new in the EXO v3 module?
EXO v3 is the successor of v2 with a lot of improvements, security enhancement, authentication mechanism upgrades, etc.
Primarily it supports REST API in v3 instead of Remote PowerShell. This REST-Based Connection helps in
- Handling complicated requests
- Fewer network failure errors
- Certificate-based authentication
- No WinRM client and Basic authentication. So improved security.
- It works based on fetching access tokens.
Why Should we use the Exchange Online PowerShell Module?
I used to be a GUI person before but not anymore 🙂 I used to do most of my work using GUI (Graphical User Interface) in the M365 portal.
This was at the beginning of my career. Once I learned how to use PowerShell and scripting, I never looked back at GUI for any tasks that require automation, repetitive or bulk tasks.
Just think about it – You have been given some basic tasks to find out how many mailboxes were created between last month and this month. Using GUI it will take ages to complete but with PowerShell, you can complete it within a matter of mins.
If you want to do any task that is repetitive and you need to do it at regular intervals, just write a script and schedule it with a Windows scheduler.
I am planning to share a lot of my personal written scripts related to all Microsoft services on this site in the future. Stay tuned!!
Please let me know if you have any questions related to this blog post and I will be happy to answer them.
Happy learning 🙂