
How To Install PowerShell 7 | Step-by-Step Guide
It is always good to have the latest version of PowerShell in our system to get the maximum benefit from Microsoft offerings and enhance your scripting language experience.
PowerShell Core 7 is the latest version released by Microsoft with many more features than its previous version.
In this blog post, I will show you how to install or upgrade PowerShell 7 on Windows and Mac OS.
How to install PowerShell 7 on Windows?
There are many ways you can install PowerShell 7 on a Windows operating system. One of them is highly recommended by Microsoft. It’s not mandatory to try only the recommended method.
If you would like to try another installation method you can feel free to do so, as all these methods are pretty straightforward.
If you follow this article, you should be able to install it without any errors. We will see the three types of installation processes in this article.
Winget to download and install PowerShell 7 (Recommended)
Microsoft recommends this method of installation when compared to other methods. Winget is a command line tool that comes with the Windows 10 modern version and Windows 11 OS by default. You don’t have to install this component separately.
In order to use it, just open the PowerShell which is already available on your machine. I am using my Windows 11 machine to show this demo.
If you search PowerShell in your search section, you should be able to see the Windows PowerShell.

Now select and click on Open option
A new window will open.

Once it opens, type the following command
winget search Microsoft.PowerShellThis command will help you to find the latest version of PowerShell that is released by Microsoft
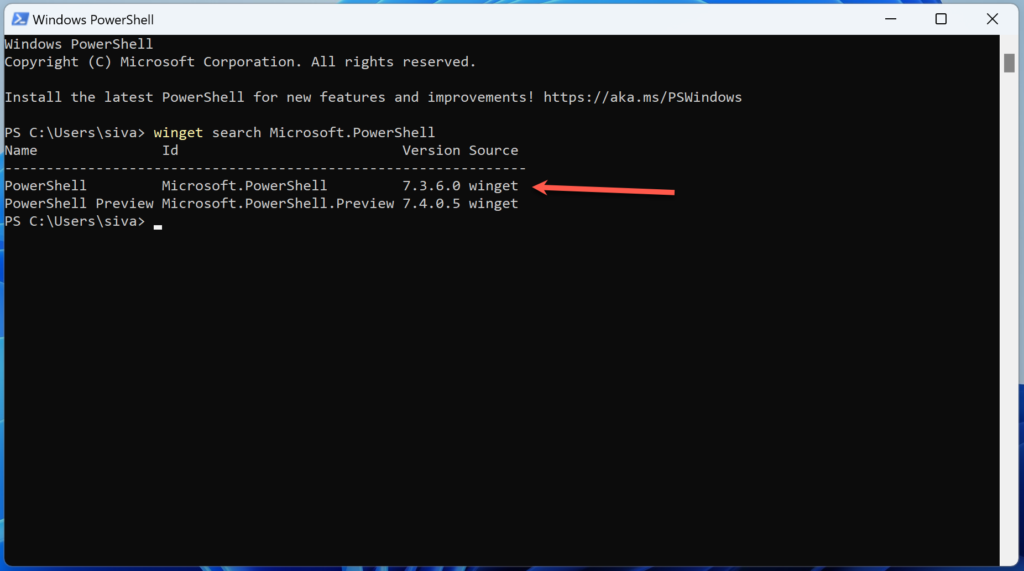
In the output section, you should see both the stable release (7.3) and the preview release (7.4).
If you want to install the preview release, you can do so as long as you are exploring it in your lab environment. For the production environment, a stable release is highly recommended.
To install the preview version, run the following command
winget install --id Microsoft.Powershell.Preview --source wingetTo install the stable version, run the following command
winget install --id Microsoft.Powershell --source wingetI am installing the stable version.

Once completed, you should see the “Successfully installed” message at the bottom of the screen.
If you try to check the current version with the default version (the same window you used to install the latest version) you will still see the version 5.1 (which comes with the Windows 11 operating system by default).
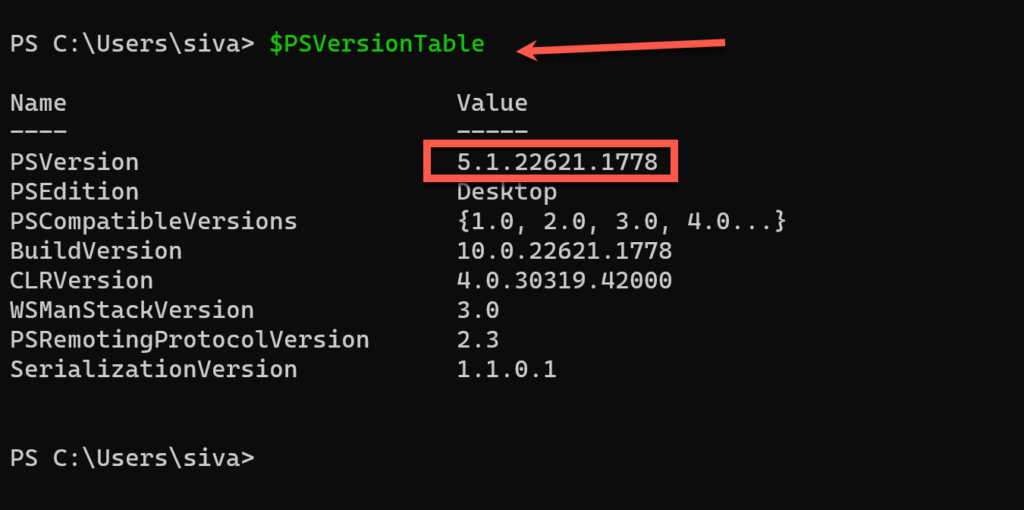
The reason is there is no in-place upgrade available from 5.1 to 7. From PowerShell 7 onwards, you can use it on any operating system like Windows, Mac, or Linux.
In order to use the latest version, you need to open the PowerShell 7 version app.
I will show you how to access the latest version of PowerShell once I covered how to install it by using other methods in this article.
If your Windows is older than 10 or you want to install using a different method then try this next method of installation.
Download and Install PowerShell 7 using the MSI package on Windows
Microsoft hosting the MSI package in GitHub. You need to download the package from GitHub and install it on your machine.
There are two packages available for you to install.
I am downloading the x64 package.
Once downloaded double-click and open it. Installation wizard will open.
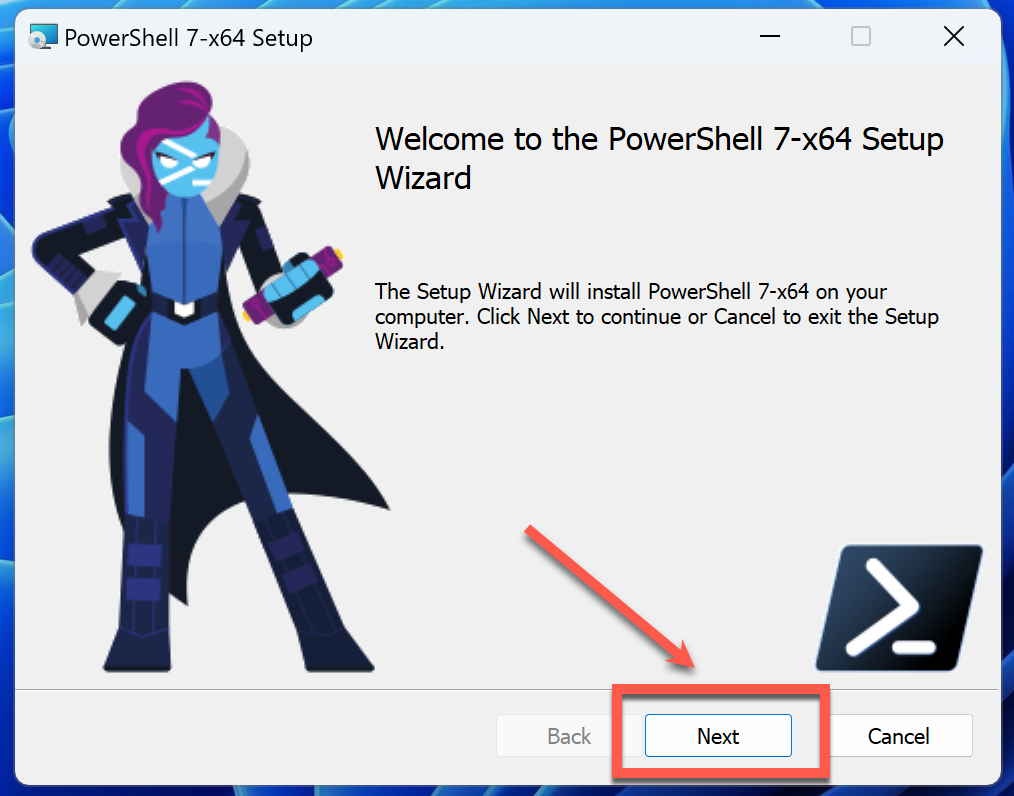
Click on the Next button to set the destination folder.

If you want to change the Installation path / Installation folder, you can click on the Change button and select the directory according to your need. I am keeping it as a default location and clicking on the Next button.
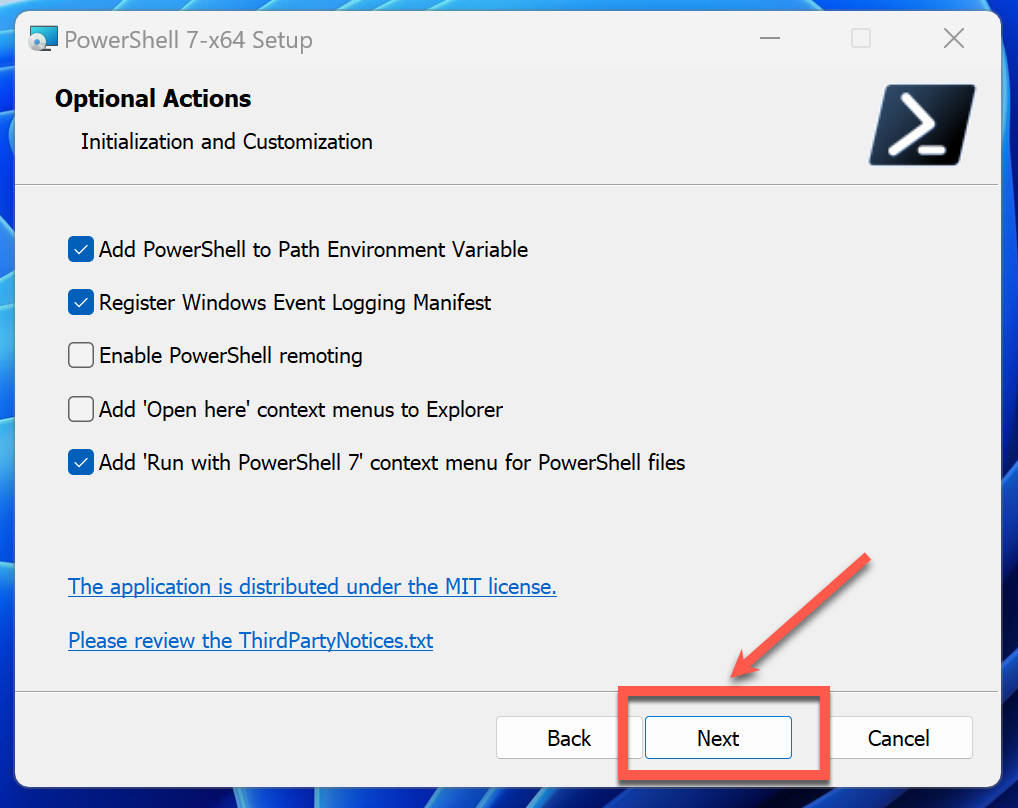
Select the required settings. I am selecting the following option
- Add PowerShell to Path Environment Variable
- Register Windows Event Logging Manifest
- Add ‘Run with PowerShell 7’ context menu for PowerShell files
Once selected click the Next button
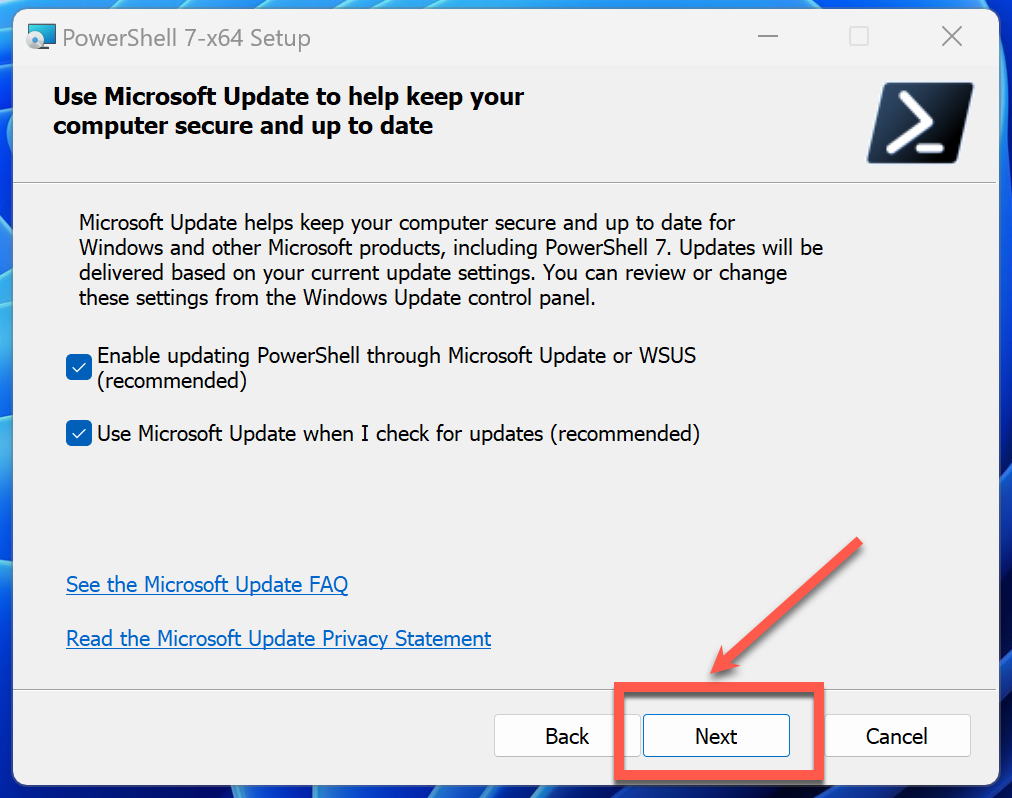
Select both the recommended options. This is to make sure to keep your package is up to date while running the Microsoft update.
Once done click the Next button.
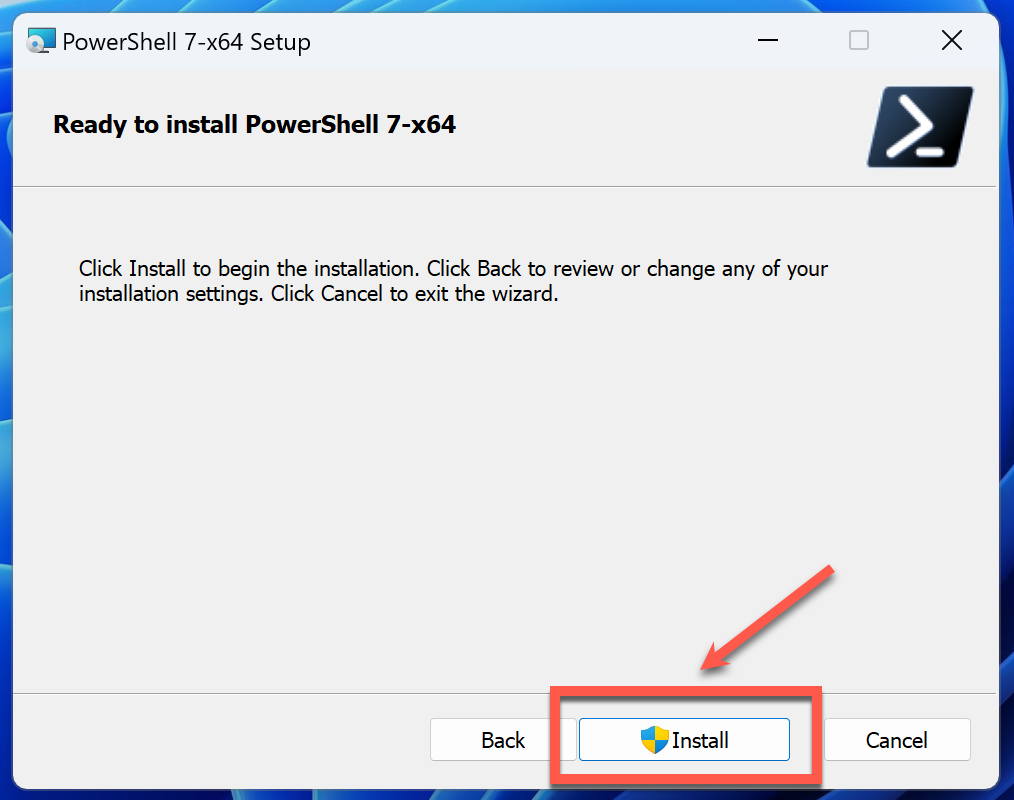
Click the Install button
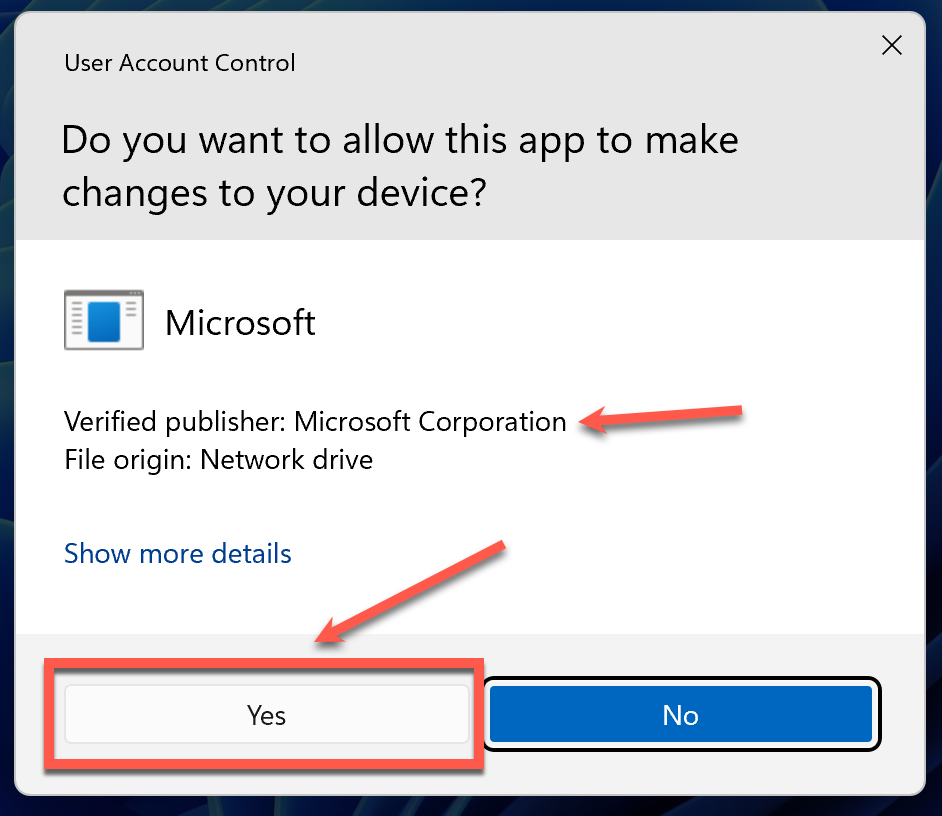
You might get the pop-up to allow it.
Even though you are downloading it from GitHub just make sure you are seeing the Verified Publisher: Microsoft Corporation and click Yes.

You can see the status of the installation.
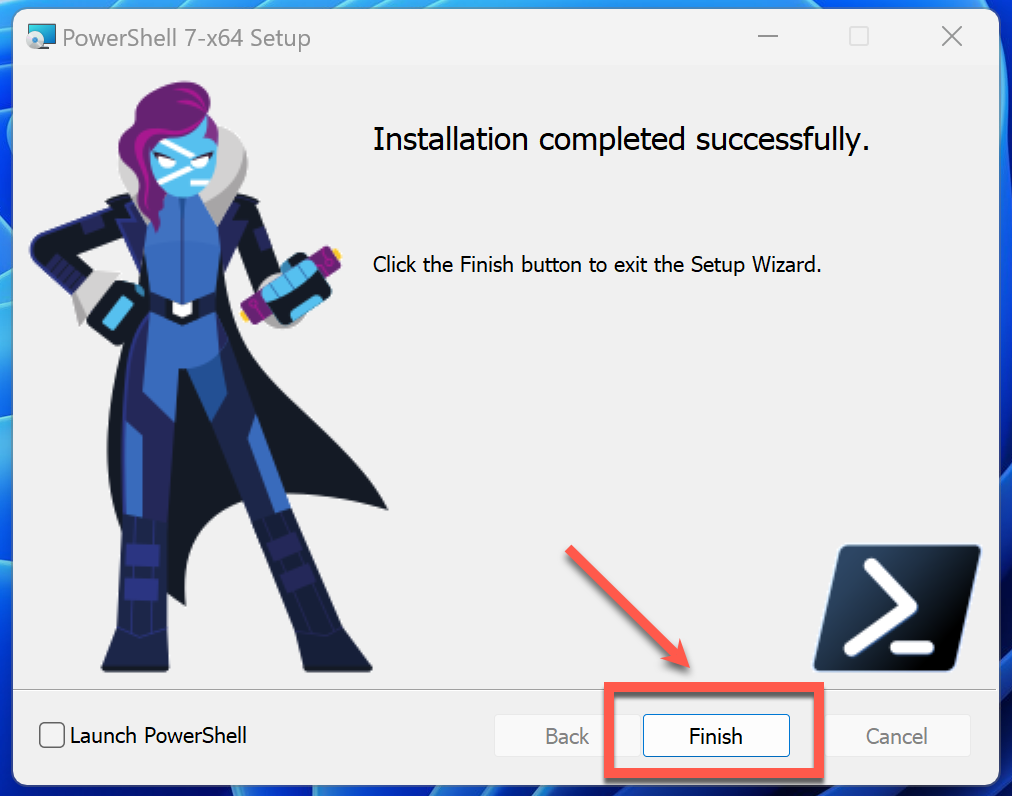
Once the installation is completed, you can click on the Finish button.
we will see how to access it, Once I covered the final method as the access part is common for all three methods.
Download and Install the PowerShell 7 app from the Microsoft Store
You can open the app from the Microsoft Store directly by using the link – PowerShell or you can open the Microsoft Store app from your Windows machine.
You can search Microsoft Store in your search bar in order to open the Store app.
Once opened, Search for PowerShell. Then open the highled app.
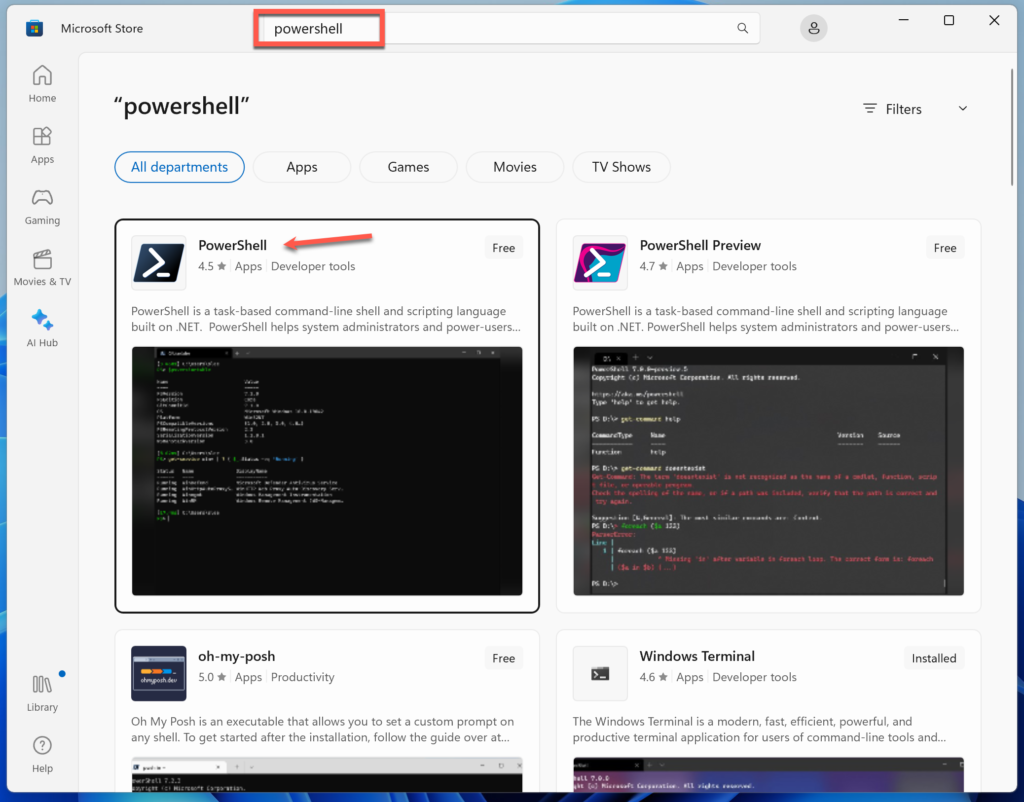
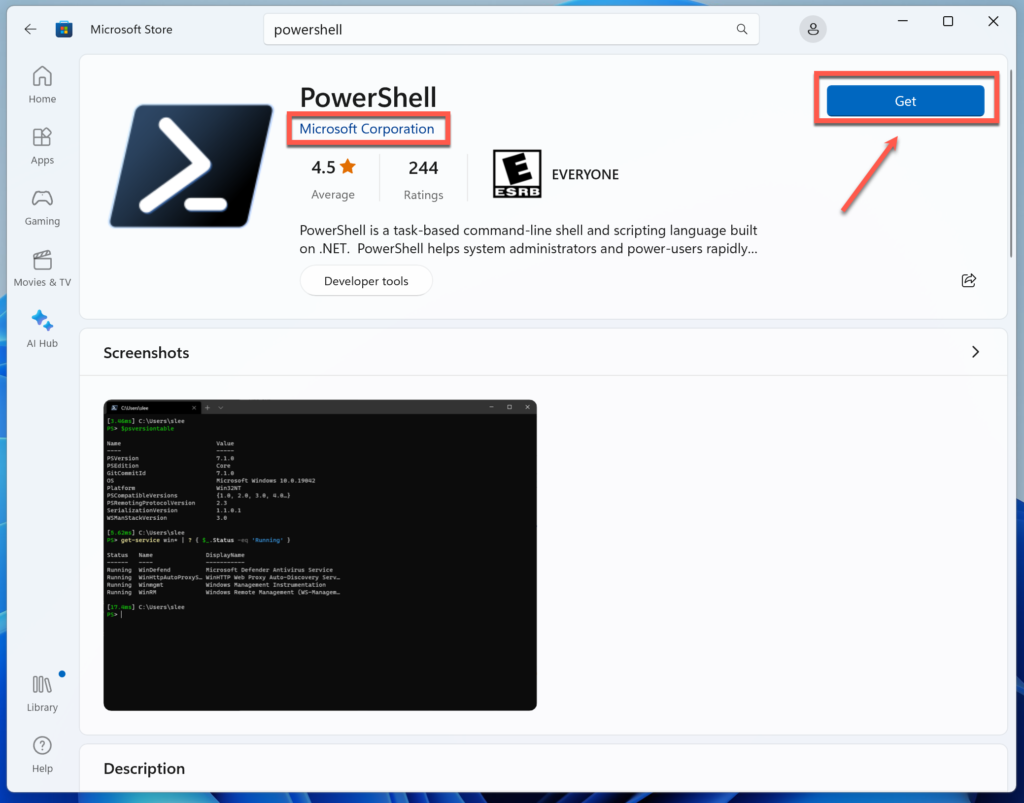
But make sure it is from Microsoft Corporation. Sometimes you can see apps are developed by third parties, here we are focusing on installing from authorized sources.
Click on the button Get.
Once you click the Get button, it will download and install the app.
On the next screen, you should see the button Open. This confirms the installation is successful.
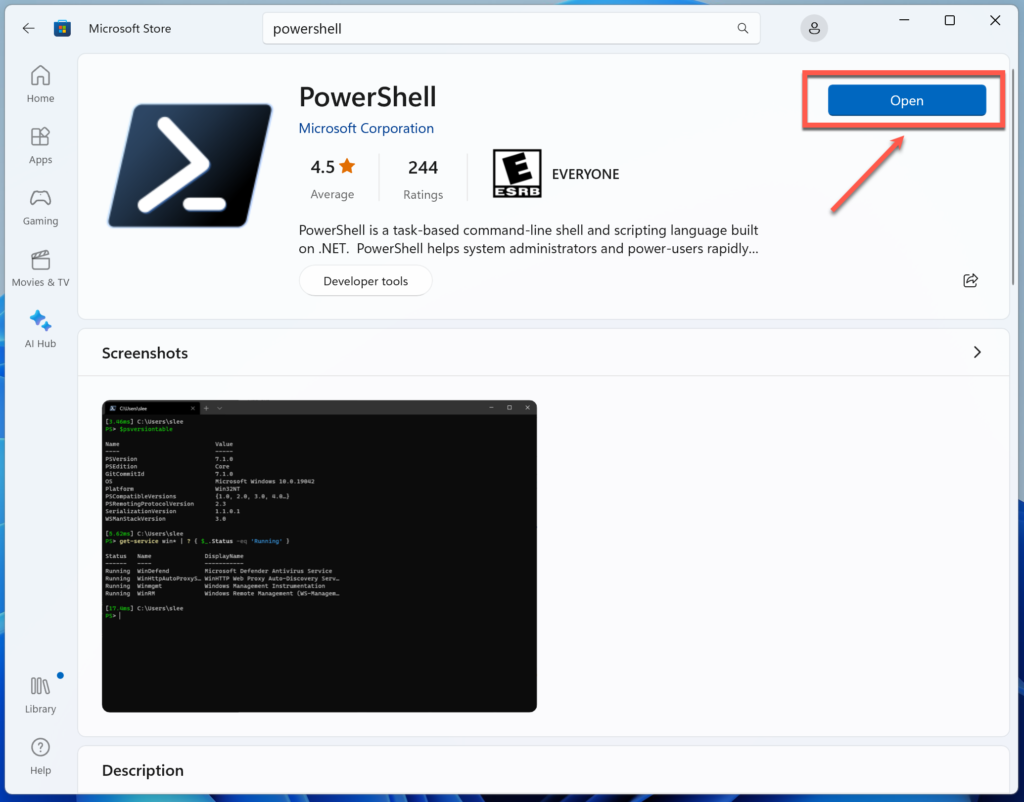
You can click on the Open button to open the PS 7 or follow the next section to open the PS 7 (PowerShell 7)
How to open PowerShell 7 on a Windows machine
You can use this method to open PS for any of the installation methods you have used before as it is the same process for all.
This is because PS 7 is a cross-platform tool so a dedicated app will be installed and you can use both 5.1 and 7 simultaneously.
If you want to use 5.1, then
- Search PowerShell in the Search section
- open the default Windows PowerShell
- click Open

If you want to use 7 then
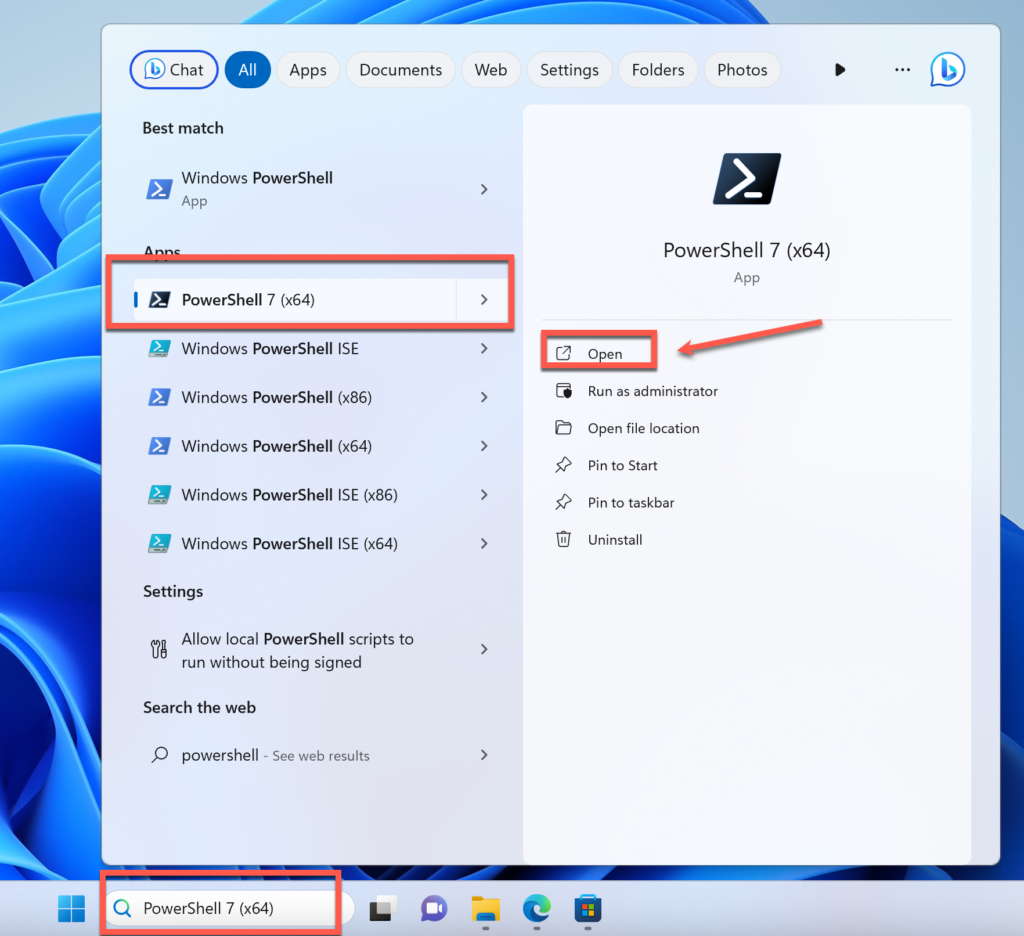
- Go to the Search bar and type PowerShell
- Select PowerShell 7 (x64)
- Click Open
Once it’s opened, you can see which version is running at the top of the window.
You can also confirm it by running the following command
$PSVersionTable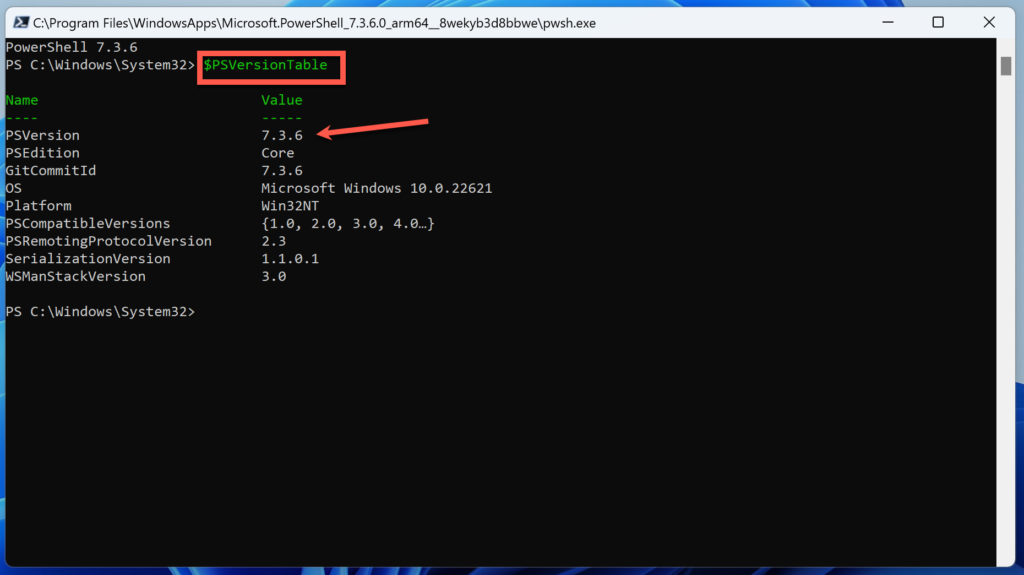
You can start using it as usual like how you will use it in any type of version.
How to download and install PowerShell 7 on a Mac
PS is a cross-platform scripting tool, you can use it on a Mac as well. You can install using two methods.
- Via HomeBrew
- Via Direct download
It requires Mac OS 10.3. If you are still on an older version, please upgrade the OS first before you try the latest PS.
Like Windows, you can install either Stable or Preview release.
I am going to install a Stable release using the HomeBrew method.
Open the Terminal using Launchpad.
We need to install HomeBrew first and then after we need to install PowerShell
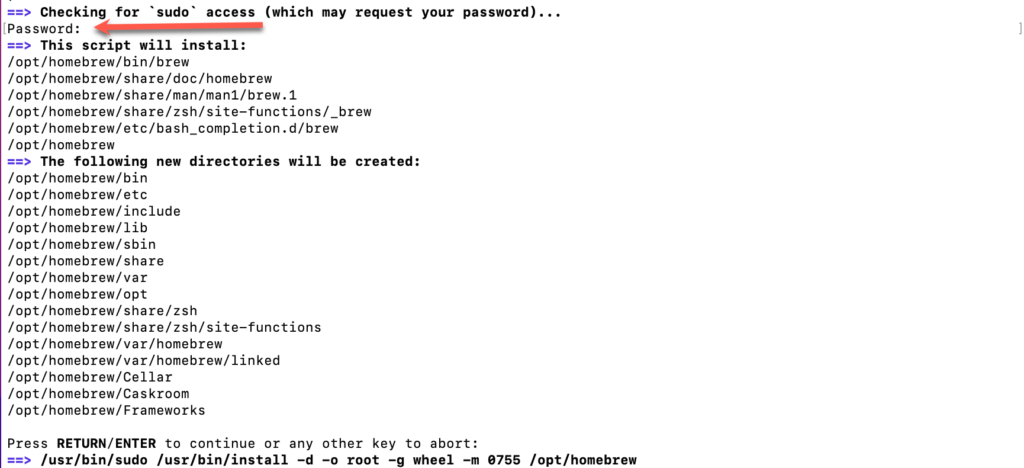
Once the Terminal is opened, type the following command
/bin/bash -c "$(curl -fsSL https://raw.githubusercontent.com/Homebrew/install/HEAD/install.sh)"It will ask you to enter the password. Type it.
Password will not be visible so if you make any type you will not be able to see it. If you are getting any errors, type the password without any mistakes and try again.
Once the successful installation of Homebrew, you must add it to your path.
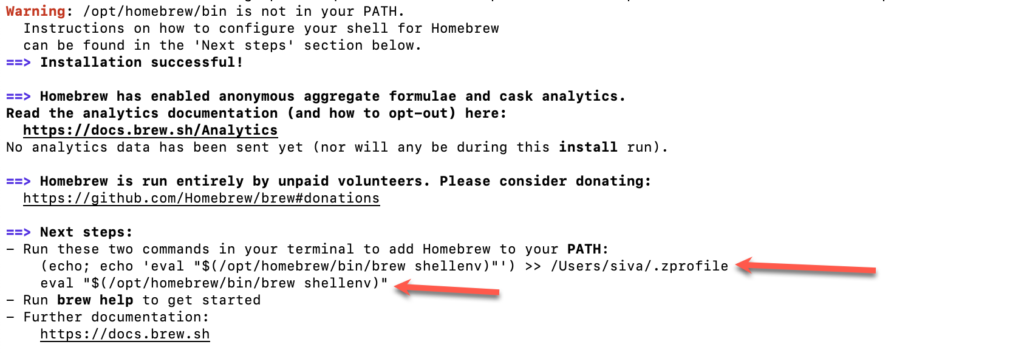
To do that copy the highlighted two lines one by one and paste it in the same terminal window.
Important: The path will vary based on your username

Then run the following command
brew install --cask powershellAgain it will ask you to enter the password.

Once the installation is completed, you should be able to see the successfully installed message.
Now type the following command to use the PS 7
pwsh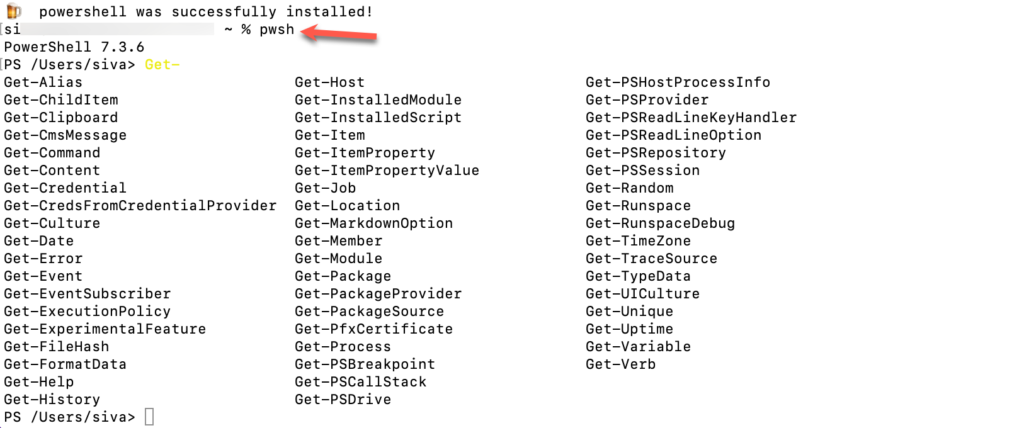
How to update PowerShell on a Mac
If you are using the older version of PowerShell on Mac, you don’t have to download and install it separately. You can easily upgrade it by following the below steps
- Open your Terminal
- Enter the following cmdlet
To update the homebrew
brew updateTo update the PowerShell
brew upgrade powershell --cask
Since I have the latest version, I am getting the warning but if you have the older version, you should see the upgrade is successful.
That’s all for today. If you have any questions please let me know in the comment section, I will be happy to answer them.
Happy learning 🙂